Electric vehicle charging
Vipps MobilePay is an excellent choice for Electric Vehicle (EV) charging, as practically all Nordic people have the app on their phone. This removes the need to download a specific charging app.
This is a simple and efficient solution that enables your customers to use your charging network with no hassle.
![]()
The best drop-in charging flow provides QR codes that can be scanned by the customer with their phone's camera or the Vipps MobilePay app.
Prerequisites
QR code on the charging station
Generate a merchant redirect QR code that contains the link to your website and the ID of the charging station. Place it on the charging station.
How to create a QR code
The QR code contains a Id that connects it to the taxi where it is located.
Here is an example HTTP POST:
{
  "id": "charging_unit_122_qr",
  "redirectUrl": "https://example.com/myChargingSite"
}
The website that the customer lands on should contain payment options, in addition to terms and conditions.
Webhooks for ePayment events
Register a webhook to alert you when your payment requests are approved.
What are webhooks?
When changes happen to your payment request, events are triggered (for example: Authorized, Terminated, Aborted, Cancelled, Expired, and many more).
You can register to receive these events, which is useful for programming an appropriate and quick response.
The webhook will send a message to your web server at the URL you specify.
Here is an example HTTP POST:
{
    "url": "https://example.com/mystore_website_backend",
    "events": ["epayments.payment.authorized.v1"]
}
Use the secret to authenticate the message with HMAC. For examples, see
Webhooks API: Request authentication.
The payload from the ePayment webhooks will be in this form:
{
    "msn": "123456",
    "reference": "24ab7cd6ef658155992",
    "pspReference": "1234567891",
    "name": "AUTHORIZED",
    "amount":
    {
        "currency": "NOK",
        "value": 35000
    },
    "timestamp": "2023-08-14T12:48:46.260Z",
    "idempotencyKey": "49ca711a9487112e1def",
    "success": true
}
Note that the payload of the webhook depends on the originating service, in this case the ePayment API.
Details
Combine the QR API and ePayment API to build this flow.
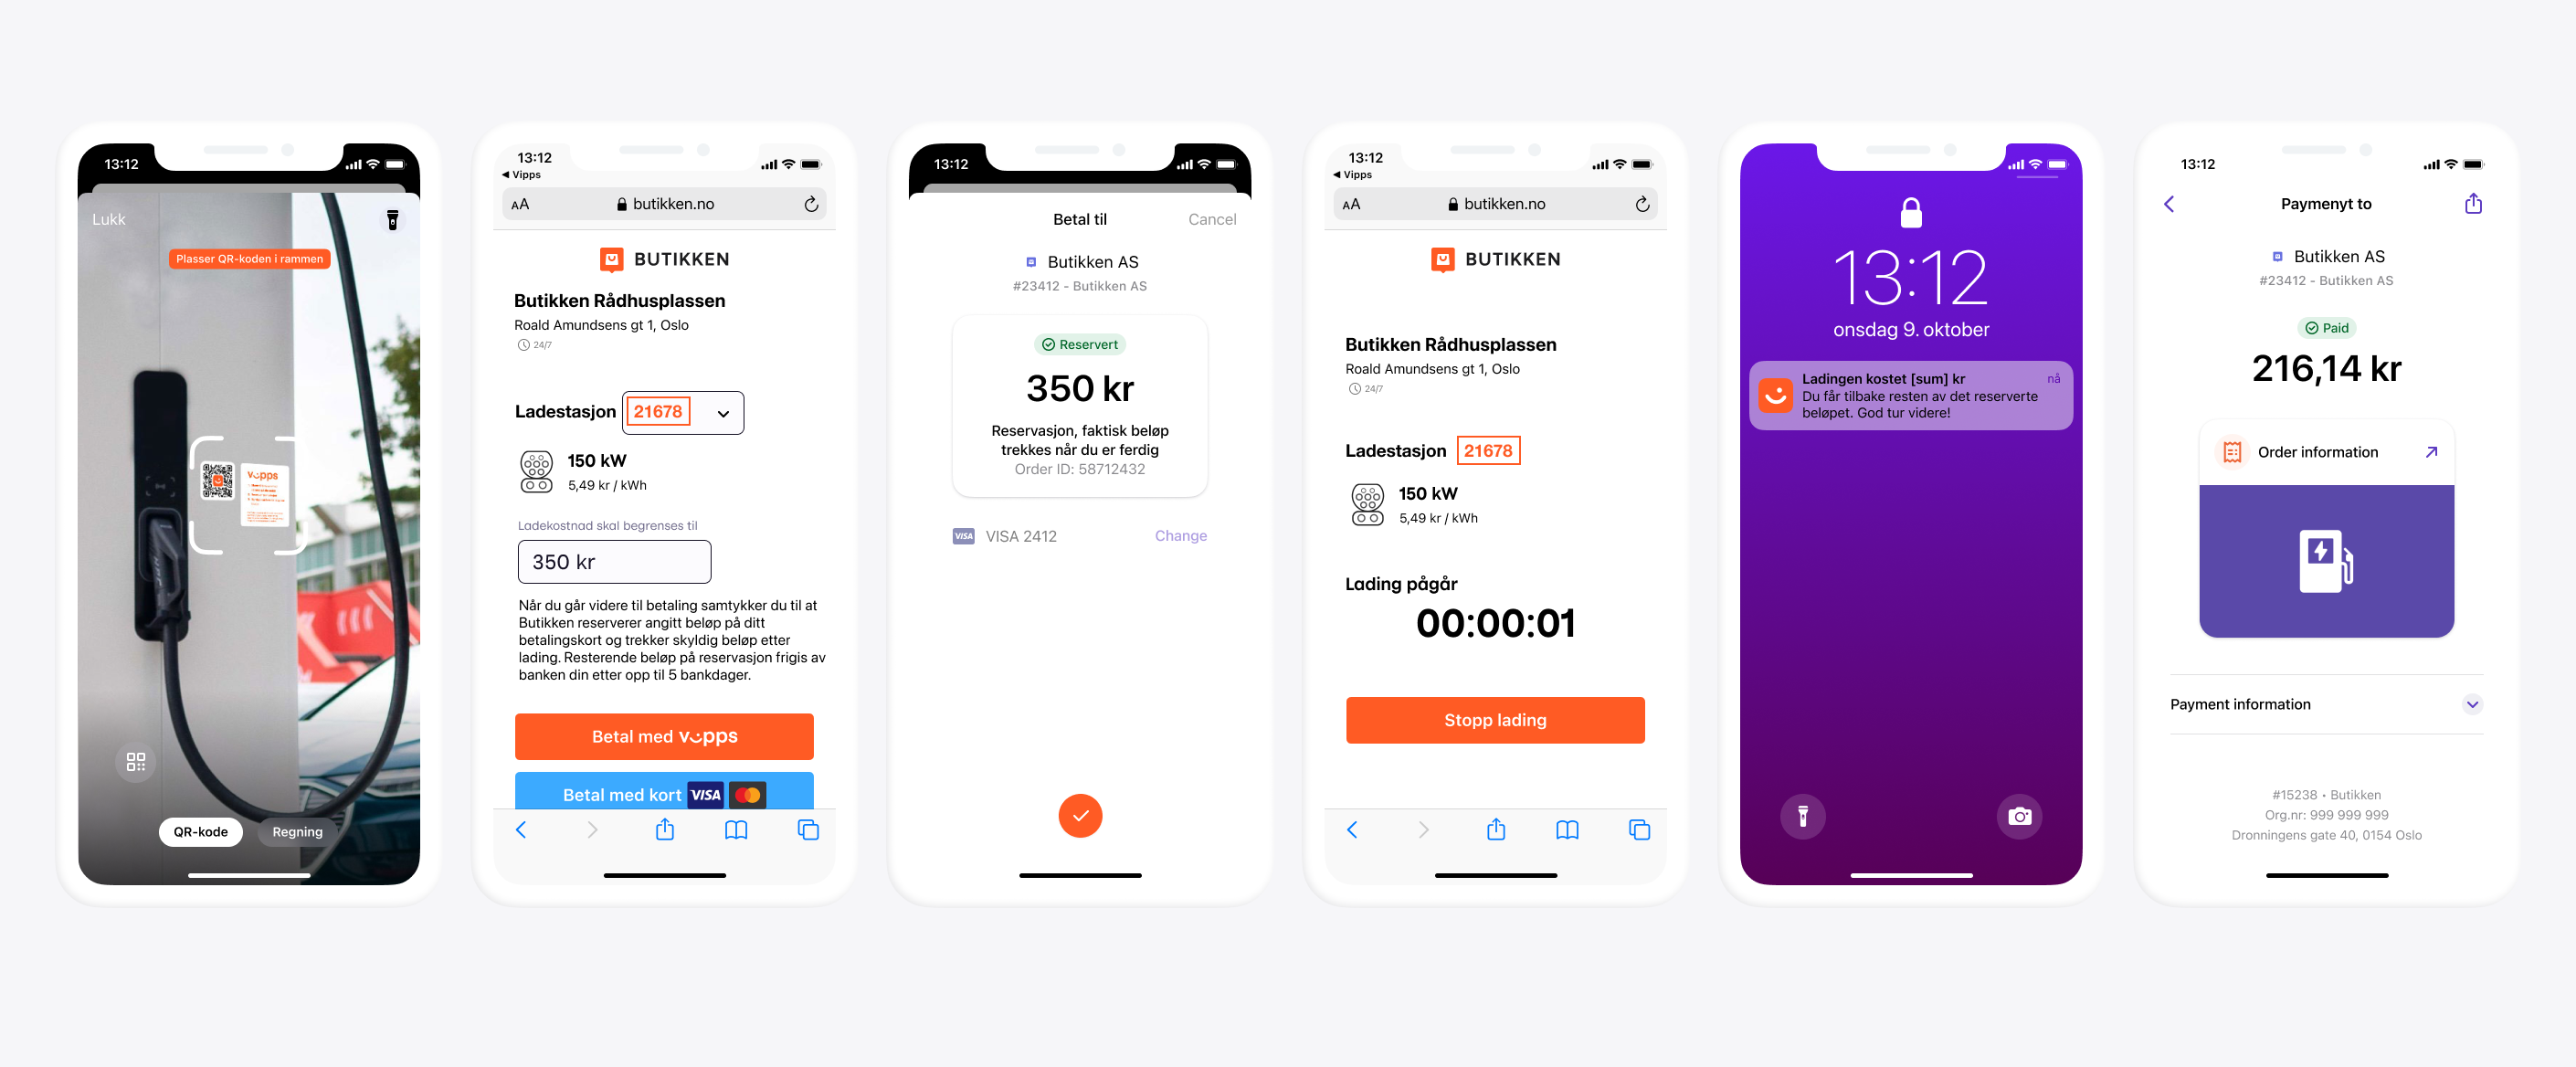
Step 1: The customer scans the QR code
When customer scans the QR code, they are redirected to your website on their phone.
Since the QR code contains an identification of the charging point, the customer doesn't have to type in any identification code to start charging.
Step 2. Initiate payment request
When the customer is ready to pay, initiate a payment request.
The payment request amount should be large enough to cover the cost of a charging session. It is usually sufficient to reserve an amount between 350 NOK and 500 NOK, but with higher electricity costs, this may change. It is also possible to let the customer choose maximum amount or reserved amount. This amount will be reserved on the customer's account and the unused amount will be released when they are finished charging.
Detailed example
Since the customer has scanned from their phone, you don't need their phone number.
This payment command can do an app-switch and open their Vipps MobilePay app with the payment request.
Specify "userFlow": "WEB_REDIRECT" to redirect the user to the app.
Specify "customerInteraction": "CUSTOMER_PRESENT".
Here is an example HTTP POST:
{
  "amount": {
    "value": 35000,
    "currency": "NOK"
  },
  "paymentMethod": {
    "type": "WALLET"
  },
  "customerInteraction": "CUSTOMER_PRESENT",
  "reference": 2486791679658155992,
  "userFlow": "WEB_REDIRECT",
  "returnUrl": "http://example.com/redirect?reference=2486791679658155992",
  "paymentDescription": "Charging session at station 21678 on October 9, 2029, 13:12."
}
Step 3. Customer approves the payment
The customer's Vipps MobilePay app should open automatically, with the maximum reservation amount visible. They can select to pay or cancel. Afterwards, they are redirected back to the charging website, where the status of the charge session is presented.
Once you know that payment was approved, you can start charging. To get confirmation that payment was approved, monitor your webhooks.
Step 4. Start charging
Once the customer has approved the payment, you can start charging. The customer can stop the charging at any time from your website screen or from the charging station's user interface.
Stop charging when charging is complete or when the customer selects to stop.
Step 5. Capture the payment
After final amount is confirmed, do a partial capture. Then, release the remaining amount from the reservation with a cancel.
Check the status of the captured payment.
Detailed example
First, the capture:
POST:/epayment/v1/payments/{reference}/capture
With body:
{
  "modificationAmount": {
    "value": 21614,
    "currency": "NOK"
  }
}
If you are set up in Vipps' systems with the correct MCC (Merchant Category Code) for EV charging (5552), we will automatically send a push notification to the customer with the captured amount.
Step 6. Cancel remaining amount
Cancel the payment for the remaining amount.
POST:/epayment/v1/payments/{reference}/cancel
Step 7. Add a receipt
Send a digital receipt with the amount paid.
Detailed example
Here is an example HTTP POST:
POST:/order-management/v2/{paymentType}/receipts/{orderId}
For paymentType, use eCom for eCom or ePayment payments.
For orderId, use the chargeId of the charge.
Body:
{
  "orderLines": [
    {
        "name": "charging",
        "id": "21678",
        "totalAmount": 21614,
        "totalAmountExcludingTax": 16210,
        "totalTaxAmount": 5404,
        "taxPercentage": 25,
        "productUrl": "https://www.example.com/evcharging",
      },
    },
  ],
  "bottomLine": {
    "currency": "NOK",
    "posId": "21678"
  }
}
Related links
Sequence diagram
Sequence diagram for the electric vehicle charging payment flow.