API guide
The QR API provides you with tools for generating these types of QR codes:
- Merchant redirect - Generate QR codes that redirect the user to your website.
- One-time payment - Generate QR codes that open the user's Vipps app on their phone and provides the payment suggestion for approval. This allows you to initiate a Vipps payment without needing to ask for the customer's telephone number.
- Merchant callback - Generate QR codes that will result in a callback to the merchant when scanned by the user. This is typically used to let the merchant know that a user is ready to pay.
All types of QR codes share the same authentication and overall design, but have slight difference in behavior and how they are made.
API version: 1.2.0.
Before you begin
This document assumes you have signed up as an organization with Vipps MobilePay and have retrieved your API credentials for the test environment from portal.vipps.no.
HTTP headers
We strongly recommend using the standard Vipps HTTP headers for all requests.
Authentication
All API calls are authenticated with an access token and an API subscription key. See Get an access token, for details.
QR code formats
The QR code image will be returned as a URL in the response for both one-time payment QR codes and merchant redirect QR codes. Opening this URL will return the image in the format and resolution set in the accept header. The URL to the image will look like this:
"url":"https://qr-generator-prod-app-service.azurewebsites.net/qr-generator/v1?token=eyJhbGciOiJIUzI1NiIsInR5cCI6IkpXVCJ9...."
The URL to the image does not require any authentication and can be shown
wherever you want. Note that one-time payment QR codes eventually will time out -
trying to open the URL to the one-time payment QR image after its expiry while
will return a 404 Not Found error. Merchant redirect QR codes can be opened forever.
Below is an example merchant redirect QR:

Accept Headers
| Header Name | Header Value | Description |
|---|---|---|
Accept | image/* | Returns a URL pointing to a svg+xml image |
Accept | image/svg+xml | Returns a URL pointing to a svg+xml image |
Accept | image/png | Returns a URL pointing to a PNG image with 800x800 size |
Accept | text/targetUrl | Returns the target URL of the QR |
The qrContent that points to https://qr.vipps.no is a shortened URL
that will be recognized and opened in the Vipps app when scanned from native camera.
Please note: It is possible to create your own QR code with the qrContent. This will require an approval from Vipps before use, so we can validate
the styling and design of the QR.
If you want to create the QR code on your own, see the design guidelines for more details about the QR format and design.
One-Time Payment QR codes
The Vipps QR API lets merchants generate Vipps QR codes that can be used to pay over the counter, without requiring the Vipps user to provide their telephone number to the merchant. These QR codes are called one-time-payment QR codes, and will need to be generated for each unique payment.

The QR code, when scanned from either the native camera or the Vipps app, will automatically open an eCom or Recurring payment in the Vipps app, where the payment can be completed. See a detailed example of how it works.
Every Vipps payment needs a unique orderId. See
Recommendations for reference and orderId.
The purchase will time out after 5 minutes, so it's not possible to print these QR codes. The QR code must be scanned within 5 minutes, and the user will then have 5 minutes to complete the payment once opened in the app. See Timeouts.
Basic flow for One-Time Payment QR code
- Initiate a Vipps eCom or Recurring payment
- Receive the payment URL as response
- Post the payment URL to the QR API
- Receive a URL to a QR code in desired format (PNG or SVG)
See the Quick start guide for examples of generating QR codes.
Initiate a payment with the Vipps eCom API
Before creating the QR code you must initiate a payment with the Vipps eCom API as is described in depth in the eCom API guide.
The request to the eCom initiate endpoint
POST:/ecomm/v2/payments
will return a response like this (the url is truncated, but the format is correct):
{
  "orderId": "acme-shop-123-order123abc",
  "url": "https://api.vipps.no/dwo-api-application/v1/deeplink/vippsgateway?v=2&token=eyJraWQiOiJqd3RrZXkiLC <snip>"
}
Be aware that the URL is only valid for 5 minutes. See Timeouts for details.
Creation of One-Time Payment QR code
Now that you have the url from the Vipps eCom API you can create a QR code
using the following endpoint:
Example of a request for a QR code image using Accept: image/png:
Headers:
Authorization: Bearer eyJ0eXAiOiJKV1QiLCJhbGciOiJSUzI1Ni <snip>
Ocp-Apim-Subscription-Key: 0f14ebcab0ec4b29ae0cb90d91b4a84a
Accept: image/png
Merchant-Serial-Number: 123456
Vipps-System-Name: Acme Commerce
Vipps-System-Version: 3.1.2
Vipps-System-Plugin-Name: acme-pos
Vipps-System-Plugin-Version 4.5.6
Body:
{
  "url": "https://api.vipps.no/dwo-api-application/v1/deeplink/vippsgateway?v=2&token=eyJraWQiOiJqd3RrZXkiLC <snip>"
}
The response will be similar to this, where the URL in the body of the response will be a link to the image as defined in the accept header:
{
  "url":"https://qr-generator-prod-app-service.azurewebsites.net/qr-generator/v1?token=eyJhbGciOiJIUzI1NiIsInR5cCI6IkpXVCJ9....",
  "expiresIn": 247
}
Please note: The expiresIn value is in seconds.
Polling
On one-time payment QR codes, you will need to get the result of the payment by polling with the
GET:/ecomm/v2/payments/{orderId}/details request.
In a physical context, we recommend a polling interval of one second. See polling guidelines for information.
Once the QR code has been opened in the app, the transactionId
field in transactionLogHistory will be set (it will not exist before the
QR code has been scanned). Once this field is set, you can safely show a
waiting for user message on your POS screen while the user finishes the payment.
Body once the QR has been opened by a user
{
    "orderId": "acme-shop-123-order123abc",
    "transactionLogHistory": [
      {
        "amount": 20000,
        "operation": "INITIATE",
        "operationSuccess": true
        "timeStamp": "2018-11-14T15:21:04.697Z",
        "transactionId": "5001420062",
        "transactionText": "One pair of Vipps socks",
      }
    ]
}
Merchant Redirect QR codes
Merchant redirect QR codes allows you to make printable QR codes that redirect the user to your webpage. This can be used for one-offs, such as TV commercials; as well as for permanent use cases, such as stickers, billboards, and magazine ads.

The QR code, when scanned from the native camera or the Vipps scanner, will take the customer straight to the web page. See a detailed example of How it works with examples of what the user will encounter.
Merchant redirect QR codes do not time out, and they don't require the Vipps app to be installed.
The QR API allows for creating, updating, getting and deleting of merchant redirect QR codes. You can later change the URL through the API without generating a new QR code.
Basic flow for Merchant Redirect QR
Create a merchant redirect QR
Later, if needed, you can:
a. Get the QR by ID
b. Update the URL to the QR
c. Delete the QR
See the quick start guide for examples of generating merchant redirect QR codes.
Creation of Merchant Redirect QR
To create a merchant redirect QR, make a HTTPS POST to:
POST:/qr/v1/merchant-redirect
An example body like this:
{
  "id": "billboard_1",
  "redirectUrl": "https://example.com/myProduct"
}
Will return a response like this:
{
  "id": "billboard_1",
  "url":"https://qr-generator-prod-app-service.azurewebsites.net/qr-generator/v1?token=eyJhbGciOiJIUzI1NiIsInR5cCI6IkpXVCJ9...."
}
The id parameter is required, and is defined by the merchant. You can later use this ID to update the merchant redirect QR codes
Updating and Deletion of QR codes
Updating QR codes is a very similar procedure to creating them. When a QR code
is updated, nothing happens to the QR itself. But, when the QR is scanned, the
user will be redirected to the new URL. The change is instantaneous. To update
the QR code, make
PUT:/qr/v1/merchant-redirect/{id}
request and with the new redirectUrl in the request body:
{
  "id": "billboard_1",
  "redirectUrl": "https://example.com/completelyDifferentProductThanBefore"
}
And the response will be exactly the same as for generating the QR the first time - and it will still point to the same image.
{
  "id": "billboard_1",
  "url":"https://qr-generator-prod-app-service.azurewebsites.net/qr-generator/v1?token=eyJhbGciOiJIUzI1NiIsInR5cCI6IkpXVCJ9...."
}
The
DELETE:/qr/v1/merchant-redirect/{id}
does what one might expect, it deletes the QR. Once deleted, merchants can generate a new QR with the same ID but the already-printed-QR will never work again.
In addition to the DELETE-endpoint, it is also possible to add a ttl-attribute in the original POST-request. This attribute sets how many seconds the QR will live, before it is deleted permanently.
Tip: If you want the same QR in different formats, perform GET calls on the same id with different accept headers and test what works best.
Merchant Callback QR codes
💥 Please note: This feature is being implemented, and is not yet available. Planned release is Q2 2023. 💥
Merchant callback QRs make it possible for users to notify merchants that they want to pay with Vipps. It is the right solution for self-checkout, vending machines, or similar situations where there is no cashier, buttons, or other ways of letting the user communicate that they want to pay with Vipps.
A merchant callback QR is given a merchantQrId that the merchant selects upon creation. Then, when the user scans the QR, a callback is sent to the merchant containing this merchantQrId. Thus, the merchant knows which QR code has been scanned, and they can act accordingly, such as starting a payment towards the user.
Here is an overview of the parameters that are specific to the Merchant Callback QR API.
| Parameter | Description |
|---|---|
merchantQrId | Merchant defined parameter. Together with MerchantSerialNumber, it uniquely identifies the QR code |
locationDescription | A description of where the QR code will be used. It will be shown in the app when the user has scanned the QR code. |
qrImageUrl | A link to the image containing the QR code |
qrContent | The content of the QR code. It is the link that is embedded in the QR code. |
How to create a Merchant Callback QR code
To create a Merchant Callback QR code, call the following endpoint PUT:/qr/v1/merchant-callback/{merchantQrId}.
The endpoint takes the merchantQrId as a path parameter and requires a request body containing the locationDescription parameter.
An example body looks like this:
{
  "locationDescription": "Kiosk"
}
If the endpoint succeeds, the QR code has been created.
Please note: The QR code will not be returned from the endpoint. Instead, the merchant needs to call the dedicated GET endpoints described below.
How to update or delete a Merchant Callback QR code
The QR code is based on the merchantQrId and merchantSerialNumber. These properties will never change.
So the only property that can be updated on a QR code is the locationDescription. To update that property the merchant simply has to call the same endpoint used for creating the QR code with the new locationDescription and then the QR code will be updated accordingly.
If a QR code is not needed any more it is best practice to delete it. There are at least two reasons for that:
- If a user scans the QR code, they will be informed that the QR code is not found. This is preferred to having the user waiting with no knowledge the QR code is no longer in use.
- When the merchant needs to print all QR codes for a particular
merchantSerialNumber, then QR codes that are not in use will not be printed.
To delete a QR code the merchant will simply have to call the endpoint DELETE:/qr/v1/merchant-callback/{merchantQrId}.
Fetching the Merchant QR codes
There are two endpoints for fetching created QR codes. One for getting one specific QR code and one for fetching all QR codes belonging to a merchantSerialNumber.
Common for both endpoints is the possibility to choose the format of the image returned, as well at the size of the QR code. These properties are defined by an Accept and Size header respectively. These are described here.
To fetch a single QR code, the merchant has to call the endpoint: GET:/qr/v1/merchant-callback/{merchantQrId}.
An example of the response from the GET endpoint looks like this:
{
  "merchantSerialNumber": "12345",
  "merchantQrId": "27072f82-c4b6-49cd-9838-10f21d87496e",
  "locationDescription": "Kiosk",
  "qrImageUrl": "https://qr.vipps.no/generate/qr.png?...",
  "qrContent": "https://qr.vipps.no/..."
}
Now the QR code image can be printed or accessed directly from the device that faces the customer. The image is located at the qrImageUrl.
To fetch all QR codes belonging to a merchantSerialNumber, the merchant needs to call the endpoint: GET:/qr/v1/merchant-callback.
The only difference is the absence of the merchantQrId path parameter.
An example of a response from this endpoint is the same as the previous, except it returns a list:
{
  [
    {
      "merchantSerialNumber": "12345",
      "merchantQrId": "27072f82-c4b6-49cd-9838-10f21d87496e",
      "locationDescription": "Kiosk",
      "qrImageUrl": "https://qr.vipps.no/generate/qr.png?...",
      "qrContent": "https://qr.vipps.no/..."
    },
    {
      "merchantSerialNumber": "12345",
      "merchantQrId": "b1482233-17a1-434d-bcd1-6ea38b15eddb",
      "locationDescription": "Bakery",
      "qrImageUrl": "https://qr.vipps.no/generate/qr.png?...",
      "qrContent": "https://qr.vipps.no/..."
    }
  ]
}
The endpoint that returns a list is nice to have if the merchant has many QR codes in the same location. It will make printing easier.
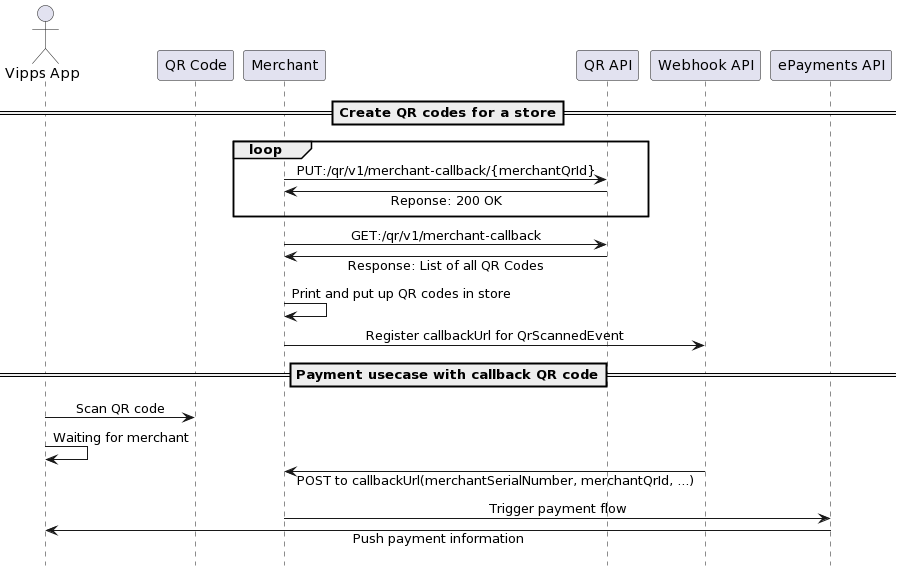
Please note: Before the merchant will receive any callbacks, they need to subscribe to the QRScannedEvent Webhook.
Here is a sequence diagram that showcases how to use the Merchant callback QR: